
In my last post, I discussed why I decided to move my server from TrueNAS to Ubuntu. Perhaps the largest software-based reason was the ability to use Docker to manage the software on my server. This post is a hybrid between a narrative telling how I got my server working and a guide to do it yourself. If you’d like any help with any of the stuff I list in this guide, feel free to reach out! I’d be glad to help.
Preparing my OS
The first time I set up my Docker instance, I did not put thought into organization and file management beforehand. This led to chaos with different applications needing access to different folders with different permissions. It made Docker volume management a mess. Because of this, I definitely recommend putting some thought into how you’re going to be storing files beforehand, including:
- Media Files
- Configuration Files for Containers
- Databases
- Download locations
I have one central folder for my Docker folder configs. (/BigThiccums/ContainerConfigs) I also place my media files in a central folder. (/BigThiccums/Media) My Plex library is within (/BigThiccums/Media/Library) and contains my Movie, TV Show, and Music folders. I’ll discuss databases shortly.
As previously described, I’m using ZFS to store my files. Docker includes native ZFS support but it’s not recommended for those “inexperienced with ZFS on Linux.” Perfect for people like me then, right? This is a home-server, so following best practices is not as crucial as the opportunity to learn the process of implementing cool technologies.
Installing Docker
One of the joys of using Linux is simply running some commands, and the software is magically installed. I sometimes find that far easier than Googling the program, finding the official website, downloading the .exe, running and configuring it pre-install. Docker is a little bit more complicated of an install than other softwares included in the default repo, but it’s not too bad.
I used the official Docker install guide here to install Docker. I ran the following commands, as pulled from the guide:
sudo apt-get update
Updating the package manager
 sudo apt-get install \
    ca-certificates \
    curl \
    gnupg \
    lsb-release
Preparing the package manager to install the GPG key
curl -fsSL https://download.docker.com/linux/ubuntu/gpg | sudo gpg --dearmor -o /usr/share/keyrings/docker-archive-keyring.gpgAdding the Docker repo’s GPG key
 echo \
  "deb [arch=$(dpkg --print-architecture) signed-by=/usr/share/keyrings/docker-archive-keyring.gpg] https://download.docker.com/linux/ubuntu \
  $(lsb_release -cs) stable" | sudo tee /etc/apt/sources.list.d/docker.list > /dev/null
Installing the Docker repository
 sudo apt-get update
 sudo apt-get install docker-ce docker-ce-cli containerd.io
Actually installing Docker
If you’re comfortable with adding your user to the docker group, you can do so by running the following command:
sudo groupadd docker && sudo usermod -aG docker $USERCreating the docker group and adding yourself to it
This may be a security risk, but it should be fine for a home server environment. This will mean you don’t have to sudo every single time you pull a new docker container – saving the number of times you will be typing in your password, but you should always be careful that the container you are pulling is from the official sources.
Docker Compose is a tool where you can have central text files control the configuration for your Docker containers. I don’t know why it isn’t included by default in Docker, as it’s a really cool feature, but you can run the following commands, as pulled from the official Docker Compose install guide:
sudo curl -L "https://github.com/docker/compose/releases/download/1.29.2/docker-compose-$(uname -s)-$(uname -m)" -o /usr/local/bin/docker-composeInstalling docker compose from the GitHub
sudo chmod +x /usr/local/bin/docker-composeMaking Docker Compose executable
I personally use Portainer as a GUI to manage my containers.
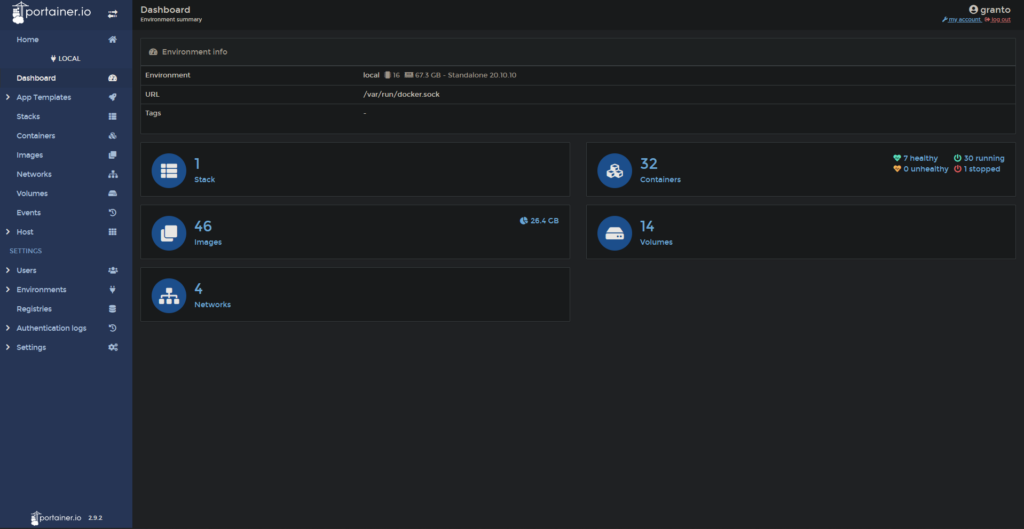
Portainer is absolutely not necessary if you want to use Docker Compose, but it does have some convenient features – I can restart a container through the web interface.

Portainer was the only container I installed using the command-line. I pulled the command from the official Portainer install guide, as with Docker.
docker volume create portainer_dataCreating the portainer data volume
 docker run -d -p 8000:8000 -p 9443:9443 --name portainer \
--restart=always \
-v /var/run/docker.sock:/var/run/docker.sock \
-v portainer_data:/data \
portainer/portainer-ce:latest
Creating and running the Docker container
Just going through that command to understand what you’re running:
- The ports 8000 and 9443 are exposed, both in the container and to the host as the same port internally as externally.
- The container is named “portainer”.
- Portainer is set up to always restart – for example, when the machine boots or when the container crashes.
- The docker socket (/var/run/docker.sock) is mounted as a volume in the container. This makes sense, as Portainer is essentialy a GUI for Docker.
- The previously created portainer_data volume is mounted as /data within the container.
- The container is the latest version of portainer-ce from the portainer repo from the Docker Hub. (CE stands for community edition.)
At this point, you should be able to put (your server’s local IPV4 address):9443 in your browser to get to the first time setup page for Portainer. You’ll create a user and connect Portainer to your local Docker environment as part of this process.
Installing The First App
I handle my server as a stack within Portainer. You could also just have a docker-compose.yml file that you update through the command line, but I personally use one central Portainer stack:

To create a stack, click the “Add Stack” button from within Portainer.

I used to have my main docker compose file in a git repo, but that didn’t last very long because I was storing the git repo in a container that was part of the stack that was being deployed. Theoretically it may have been fine, but I had some deployment issues and was trying to eliminate variables, so I manually copy and paste my docker compose file.
I personally use Microsoft’s open source code editor, VS Code, to work with my Docker Compose files. It’s available on Mac, Windows, Linux, and now it’s available in the web browser at https://vscode.dev.

The first app I implemented in Docker Compose was a reverse proxy through Nginx Proxy Manager. A reverse proxy acts like a traffic director for your locally hosted web applications. You give the reverse proxy full control of your web ports (80 for http, 443 for https). A reverse proxy also can handle SSL encryption for you in one centralized place rather than per app.
Nginx requires a MySQL database to store information. Docker is ideally stateless, meaning you can dump in your docker-compose file and get a working stack on any machine. Some blogs recommend having a separate database container per app (which seems like a waste of resources) or having your database outside of Docker. I ignore those recommendations for convenience[‘s] sake and have one central database container.
MariaDB is a fully open source alternative to MySQL, which is dual licensed. For almost all situations, MySQL and MariaDB are entirely compatible. I deployed my MariaDB container using the following Docker Compose code:
version: "2"
services:
  db:
    image: yobasystems/alpine-mariadb:latest
    container_name: db
    restart: always
    environment:
      MYSQL_ROOT_PASSWORD: 'root-pass'
      MYSQL_DATABASE: 'npm'
      MYSQL_USER: 'npm'
      MYSQL_PASSWORD: 'npm-pass'
    volumes:
      - /BigThiccums/ContainerConfigs/MariaDB/data/mysql:/var/lib/mysql
This is the backend database that our proxy will use. I recommend changing the passwords to something secure – I personally generate random passwords using Lastpass.
To create the actual Nginx Proxy Manager container, append this to your Compose file:
  npm:
    image: 'jc21/nginx-proxy-manager:latest'
    container_name: npm
    restart: always
    ports:
      - '80:80'
      - '443:443'
      - '81:81'
    environment:
      DB_MYSQL_HOST: "db"
      DB_MYSQL_PORT: 3306
      DB_MYSQL_USER: "npm"
      DB_MYSQL_PASSWORD: "npm-pass"
      DB_MYSQL_NAME: "npm"
      DISABLE_IPV6: 'true'
    volumes:
      - /BigThiccums/ContainerConfigs/NPM/data:/data
      - /BigThiccums/ContainerConfigs/NPM/letsencrypt:/etc/letsencrypt
    depends_on:
      - db
3306 is the default MySQL port. You’ll access your control panel from port 81, while the webserver will be on ports 80 and 443. In order to take advantage of your new reverse proxy, you’ll need to open ports 80 and 443 on your router. My personal router is an eero, so I opened it up there:

This meant that if you accessed my the public IP assigned by my ISP at ports 80 and 443, you would see the Nginx Proxy Manager welcome page:

In order to take advantage of Nginx Proxy Manager, I recommend buying your own domain. There are many places you can buy a domain – Google Domains, Namecheap, or GoDaddy. I personally use Cloudflare to handle my domain needs – they offer domains at wholesale prices and have plenty of DNS tools. Not a sponsor, but I totally recommend their services. Once you have a domain, you can add a wildcard A record (*.example.com) to your domain as your public IP. If you choose to use Cloudflare, this means you no longer can take advantage of their DNS proxying services.
Once yourdomain.com leads to the Nginx Proxy Manager page above, you can start adding hosts within your Nginx Proxy Manager panel. To get there, go to (Server’s Local IPV4):81. The software will ask you to create a new user to secure your proxy. Then it’s off to create your first host!

Be sure to change the IP listed there to your server’s local IP.
This exposes your Nginx Proxy Manager panel to the public internet. Luckily you have the authentication set up, so there’s little reason to worry. However, exposing your server to the public internet does have security consequences. Your public IP can give a vague idea of where you live. If there are security vulnerabilities in any of the software you deploy, having ports open can provide a vector for attack. The risk is relatively small, but home-hosting isn’t without consequences.
Go ahead and click save. Now try going to your newly created address.
You might be able to just fine, or you might see a security warning. We haven’t yet set up encryption, so this is normal at this point.

Because of the settings I have on my domain, I can’t resolve a connection unless it is encrypted. We can set up SSL encryption within Nginx by going to the SSL tab at the top of the navigation bar:


As with the A record, I recommend creating one wildcard certificate rather than many individual certificate. If you’re with Cloudflare like I am, the process is relatively simple. You can find your API key from Cloudflare Dashboard like so:


Now that you have your Cloudflare API key, go click “Add SSL Certificate” and then “Let’s Encrypt“

Fill out the details you need to. I added a certificate for my base domain (grantmclravy.com) and a wildcard subdomain (*.grantmclravy.com).
Now you have a some certificates. You can edit your previous host to add your fancy new SSL certificate.

I always like to force SSL when it’s available – there’s no point allowing yourself to accidentally send sensitive data over the unencrypted version of your website when an encrypted one is readily available.
You can also add a proxy entry for the portainer portal using the exact same process. You already have the cert created, so just enter {yourserverip}:9443 in the proxy host, noting that Portainer by default uses self-signed SSL, so you would select https as your protocol rather than http.
Now you’ve deployed an app using Docker Compose through Portainer! In my next post, I’ll talk about some other cool things you can get your server to do, including a way to handily work through digitizing your physical media library through Plex.


[…] my last post, I discussed how I was using Docker to deploy web apps on my home server. In the past month since […]
[…] used my own guide to install all this – part four of this series. The Uptime Kuma install was as easy as adding the following lines to my Docker Compose […]