
Data makes the world go round. According to the International Data Corporation, a research company dedicated to studying how worldwide data is created, 59 zettabytes of data was created in 2020. That’s a ridiculous amount of information, and it takes vast numbers of huge datacenters all across the globe to store it somewhere. I personally have a huge amount of data I’ve created since I’ve started using personal computers at age 4. Because of this ever-increasing amount of data I have created, a few years ago, I decided to sign up for the Google Drive for Business unlimited storage plan. In mid-2020, Google made the announcement that these plans would no longer be unlimited. By that point, I had uploaded near 13TB of data to Google drive and I needed somewhere to put it.
“I might be considered a digital hoarder.”
— Me, If I’m being honest
I don’t believe in deleting files. Do I truly need a third take from a film project from 2017? Probably not. I have backups from hard drives from every computer I’ve personally owned. I have copies of every family photo in multiple places just in case one of the hard drives I have it stored on fails. My personal Google Drive is backed up to another Google Drive provided to me with unlimited storage from Cedarville University from that one time I took three classes there. I’m pretty sure Google hates me, but they still get my money every month.
“But why couldn’t I just own my data?”
— Also me, when trying to justify this project
One reason I decided to build my own home server was because of the idea of digital independence- owning the data I’ve created physically rather than trusting it to some cloud provider. Rather than the data being stored “in the cloud” – in some datacenter where I have no idea where it is, I could have my files on a server right next to my PC.
“Also, owning a server is just really cool!”
— A nerd who likes playing with technology
So how would a college kid with no server building experience handle building a machine like this?
My Goals / philosophy for my server build
- Recycle as much as possible from my previous PC.My previous computer seemed to have issues. From drive caching issues to random shutdowns to overheating, this PC would not seem to work properly, despite having decent hardware. As I replaced different parts yet issues persisted, I amassed a collection of perfectly functional computer hardware that was almost a full computer but not quite. When I decided to go forward with the home cloud server due to a hard drive sale, I used my computer part graveyard as a starting ground.
- Keep this server small and portable.As a college student, I move around quite a bit. From dorm room to my parents place to my (eventual) apartment, I didn’t want a big chonky computer that is difficult to move.
- Be crazy adjustable.I wanted this server to do a ton of different things, not just be a network-attached-storage (NAS) device. I was hoping to be able to spin up virtual machines (VMs,) manage home automation, store files, play media, and run websites. Overall, I wanted this server to be a tool for me to learn cool nerdy IT stuff.
The parts
Click any of the images to go buy them yourself! I don’t do referral links or anything like that – these are just products I personally bought and like. I’ve linked the retailers that I personally bought from, but you should definitely price compare before pulling the trigger.
The drives
The most important part of any file storage server is where the files will actually be stored. A sale on 14TB Seagate Expansion drives from Newegg was actually what prompted me to pull the trigger of actually building the server (combined with my stimulus check burning a hole in my pocket.)

Buying these external hard drives is a great way to get hard drives far cheaper than buying a-la-carte. I shucked these drives and was pleasantly surprised to find Seagate Exos Enterprise drives inside, which retail on Amazon for ~$500. Paying $1150 for 70TB instead of $2500 is certainly preferable.
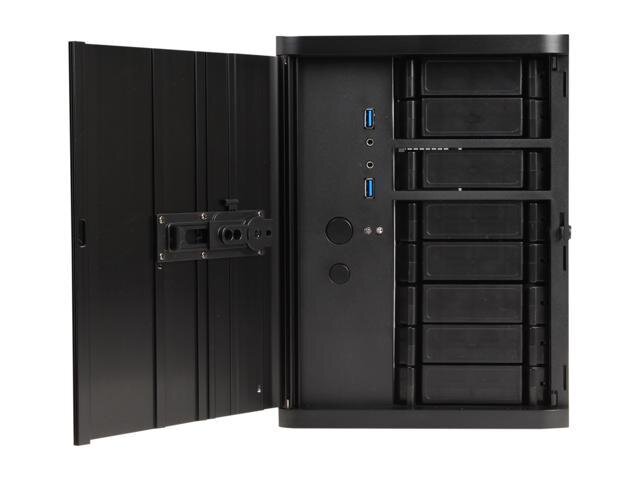
The case
In order to fit all these drives in a tiny chassis, I needed to find a specialized NAS case. You can’t just chuck five 3.5in hard drives in a normal small-form-factor PC case. Through researching, I came across this beauty:

Though this case was quite pricey at $200 and was designed in 2014, it checked all the boxes for what I was looking for. The black brushed aluminum front looks quite nice, although the back is plain gray stainless steel that looks like generic Dell office machine. I attribute this to older PC building sensibilities from 2014, plus this case is likely a low-volume, high-margin product for nerds like me.
M.2 to SATA 3 adapter
Because I was building a small form factor computer, I needed to use a Mini-ITX motherboard. That meant that I wouldn’t have tons of SATA ports like modern ATX boards typically do. Luckily for me, through the wonders of Amazon sellers providing every possible product known to man, I found this M.2 to SATA adapter:
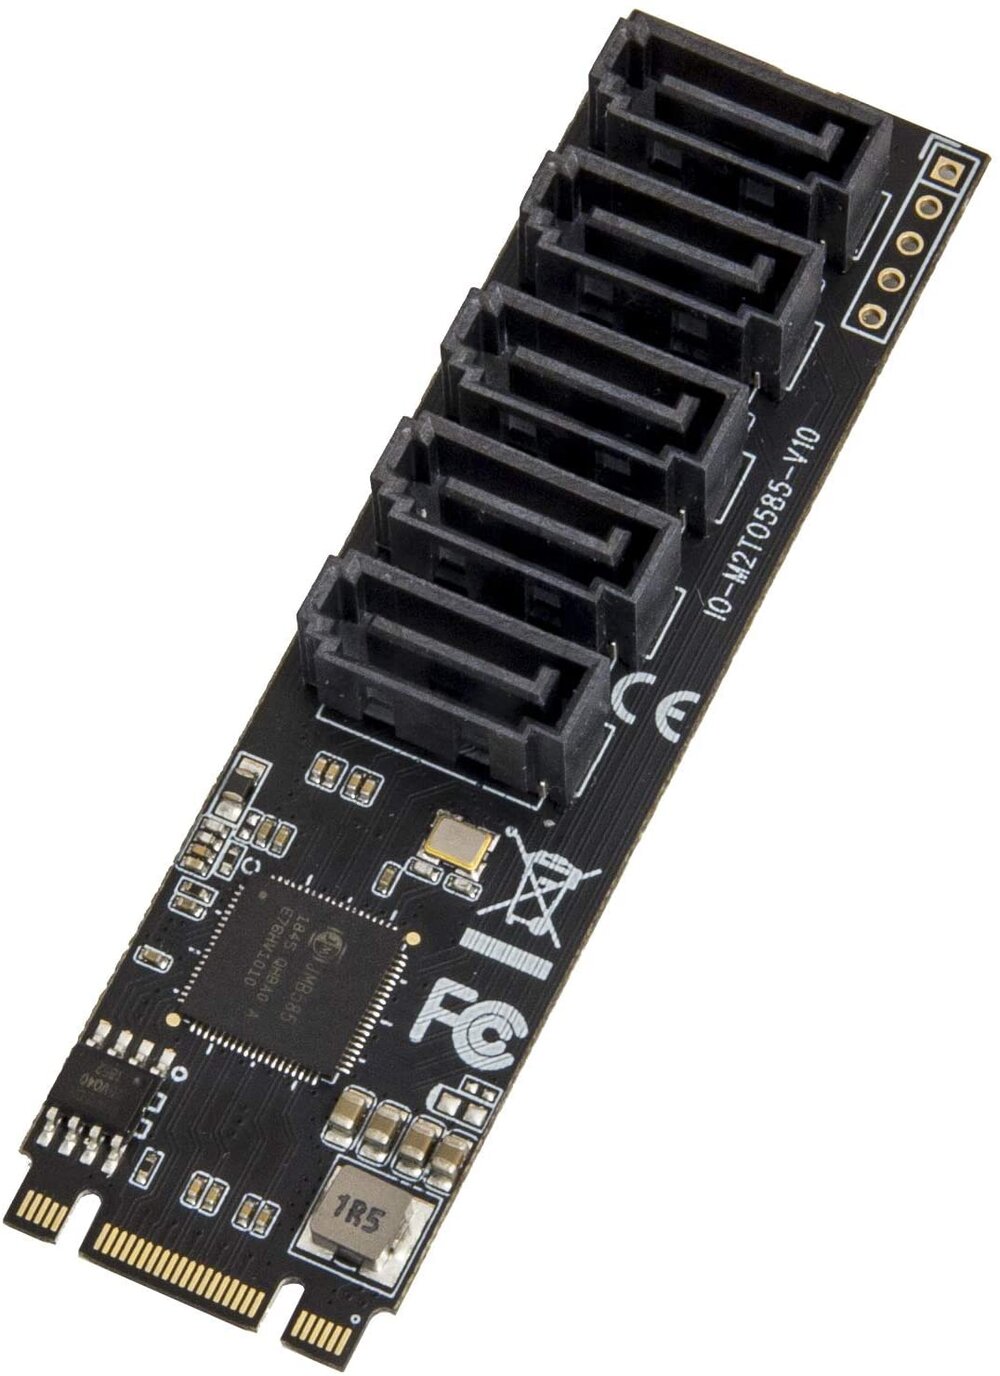
The rest of these parts are ripped from my PC graveyard when I was fixing my small form factor gaming PC, Berthita.
CPU
Because this is more than just a NAS to transfer files, I wanted a CPU with a little more oomph. A Ryzen 7 3700x is probably a bit overpowered for what I’m using it for right now, but it allows me room to grow and play with Plex, VMs, and other toys. I kept the stock cooler because I don’t plan to push it crazy hard right now.

Motherboard
Why go with an Asrock B550M Mini-ITX? Because it’s what I had in my technology drawer in my dorm room.

Power supply
Small form factor computers need small power supplies. Since I wouldn’t have a power-hungry GPU like the new 3000-series from NVIDIA, I didn’t need a ton of power for the NAS. However, I did plan on installing a 3080 in my main PC… if I could only find one. I upgraded Berthita to a CoolerMaster 850w SFX Gold in preparation for the day when plebs like me can obtain cards like that. My server got the hand-me-down EVGA SuperNOVA 650w SFX gold.

Random Access Memory
Besides being the greatest album of all time, RAM is the one part that I’m probably going to upgrade in the future. I went with 16GB of Corsair Vengeance LPX DRR4-3600 because my friend down the hall was willing to sell it to me.

SSD Cache
I probably don’t need an SSD cache, but I got a cheap 120GB SSD from Kingston off Newegg for $20 when I ordered the drives anyway.

GPU
Because the Ryzen 3700x is a Gamer CPU™ that doesn’t have integrated graphics, I needed a GPU to get a display out to configure the NAS for the first time. I went with a GT210 off Ebay for $20. Useful for getting a display out of a computer and not much more, but it does exactly what I need it to.

All these parts magically came together and the server works perfectly without a hitch… right?
Obviously not, this is a computer. In my next part of this blog post series, I’ll go through the build process and the joys of software installation. If you’ve made it this far without your eyes glazing over,
- You’re obviously a huge nerd like me
- I appreciate your time and attention!
I had a blast recounting my server part selection. If you have any questions, hit me up in the comments or contact me about it – I’d be glad to talk about it!


